Making MDX blog with Nextjs - Part 2
Jashn Maloo / October 19, 2020
In the last post we finished with adding mdx files, getting slug and other details for index page and completed index page for posts. I recommend you to get going by completing the part-1 first if you haven't done it. It build the base for what we're going to do now.
All we gotta do now is to add that dynamic page we talked in the last post. I know I'm moving directly in the building part without discussing anything right now, but it's better this way. So let's get going.
Repo: mdx-blog-with-nextjs
Live: Next MDX Blog
1. Adding post fetching logic
Before we start making our dynamic page for posts, we've to add some logic regarding how and what are we fetching in that file. So in the end of
//Get slugs// ./lib/posts.js//...export const getSortedPosts = () => {//...};//Get Slugsexport const getAllPostSlugs = () => {const fileNames = fs.readdirSync(postDirectory);return fileNames.map((filename) => {return {params: {slug: filename.replace(".mdx", "")}};});};//Get Post based on Slugexport const getPostdata = async (slug) => {const fullPath = path.join(postDirectory, `${slug}.mdx`);const postContent = fs.readFileSync(fullPath, "utf8");return postContent;};
Here,
- getAllPostSlugsis creating and fetching slugs from all the posts
- getPostDatais used to find content of the post by navigating to the file using slug it gets as parameter and returnspost content.
These two functions are the master functions because using these two functions only, we'll be getting all our content and pages.
2. Making [slug].js page
Now that we've the logic to get slug and post from that slug, let's finally build the
If you're familiar with dynamic routing is react, we use
In the
// ./blog/[slug].js/** @jsx jsx */import { getAllPostSlugs, getPostdata } from "../../lib/posts";import { Box, jsx, Text, Divider, Flex } from "theme-ui";import matter from "gray-matter";export default function Posts({ source, frontMatter }) {return (<Box sx={{ variant: "containers.page" }}><Box sx={{ mt: "4rem" }}><h1>{frontMatter.title}</h1><Divider color="muted" /><Box>{source}</Box></Box></Box>);}export async function getStaticPaths() {const paths = getAllPostSlugs();return {paths,fallback: false};}export async function getStaticProps({ params }) {const postContent = await getPostdata(params.slug);const { data, content } = matter(postContent);return {props: {source: content,frontMatter: data}};}
Isn't this mostly like the index page we built earlier? So what makes it dynamic apart from the filename? This time we've another function provided by nextjs,
As we know that all the posts will be created at build time, so that means our dynamic page will be statically generated, interesting right? So
For all the paths pre-rendered, URL parameter is passed into
Messy, right?
3. Adding Components to MDX
One of the main aspect differring mdx with md is using components within itself. So let's create two simple custom components. Make a
// ./components/MyButton.js/** @jsx jsx */import { Button, jsx } from "theme-ui";const MyButton = ({ text, check }) => {return (<Button sx={{ width: "100%", bg: check ? "steelblue" : "coral", my: 2 }}>{text}</Button>);};export default MyButton;
// ./components/MyBackground.js/** @jsx jsx */import { jsx } from "theme-ui";const MyBackground = ({ children }) => {return <div sx={{ bg: "cornsilk", py: 1 }}>{children}</div>;};export default MyBackground;
Let's add these components to our posts.
// getting-started-with-mdx.mdx---//...front-matter---import MyButton from "../components/MyButton.js"import MyBackground from "../components/MyBackground.js";//...rest of the content<MyBackground>[MDX](https://mdxjs.com) is markdown for component era.</MyBackground><MyButton text="Click"/>
// some-random-points.mdx---//...---import MyButton from "../components/MyButton.js"//...<MyButton check text="Click"/>
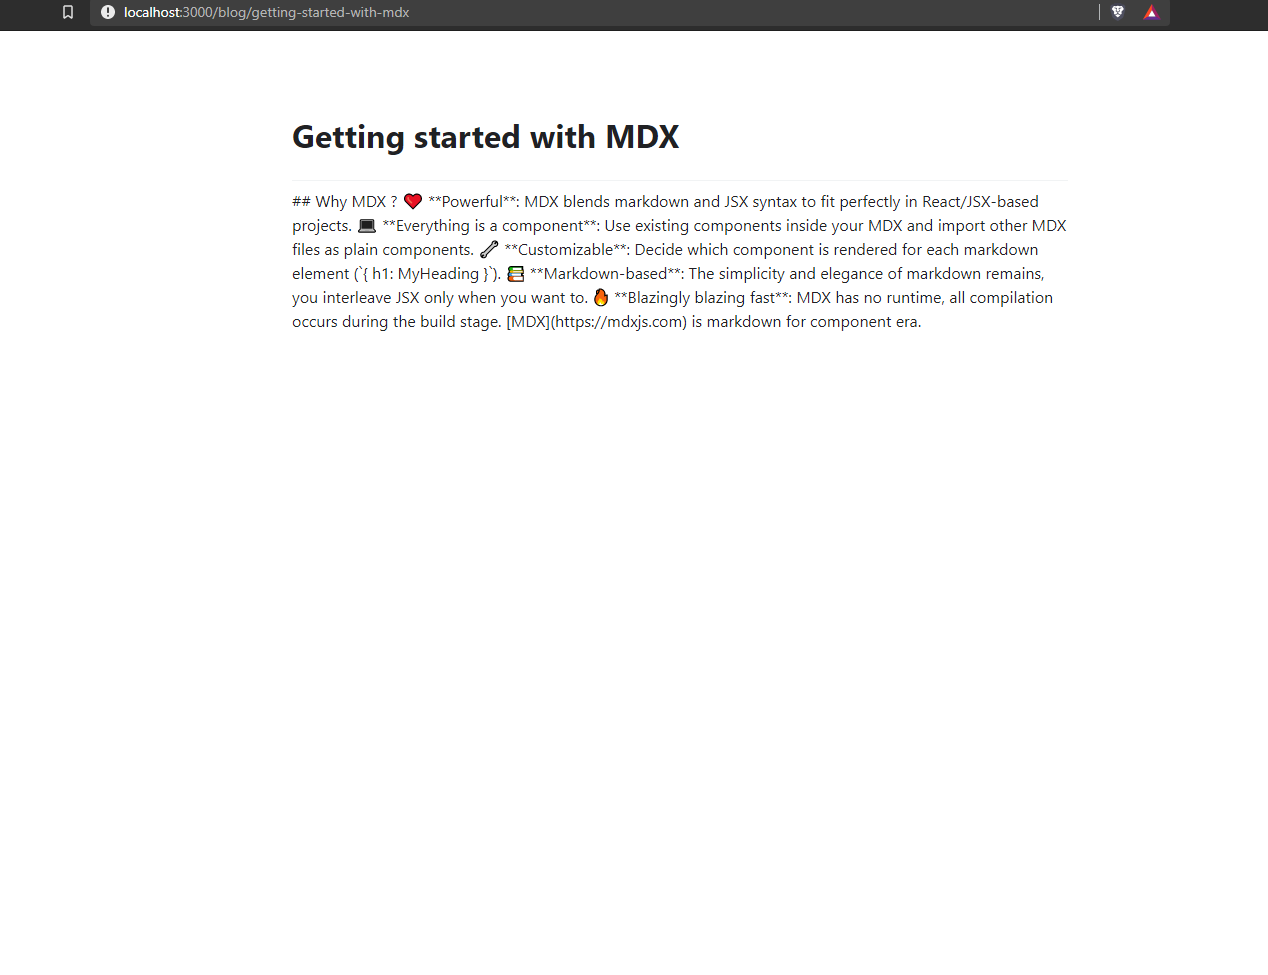
And this is how the post will look now
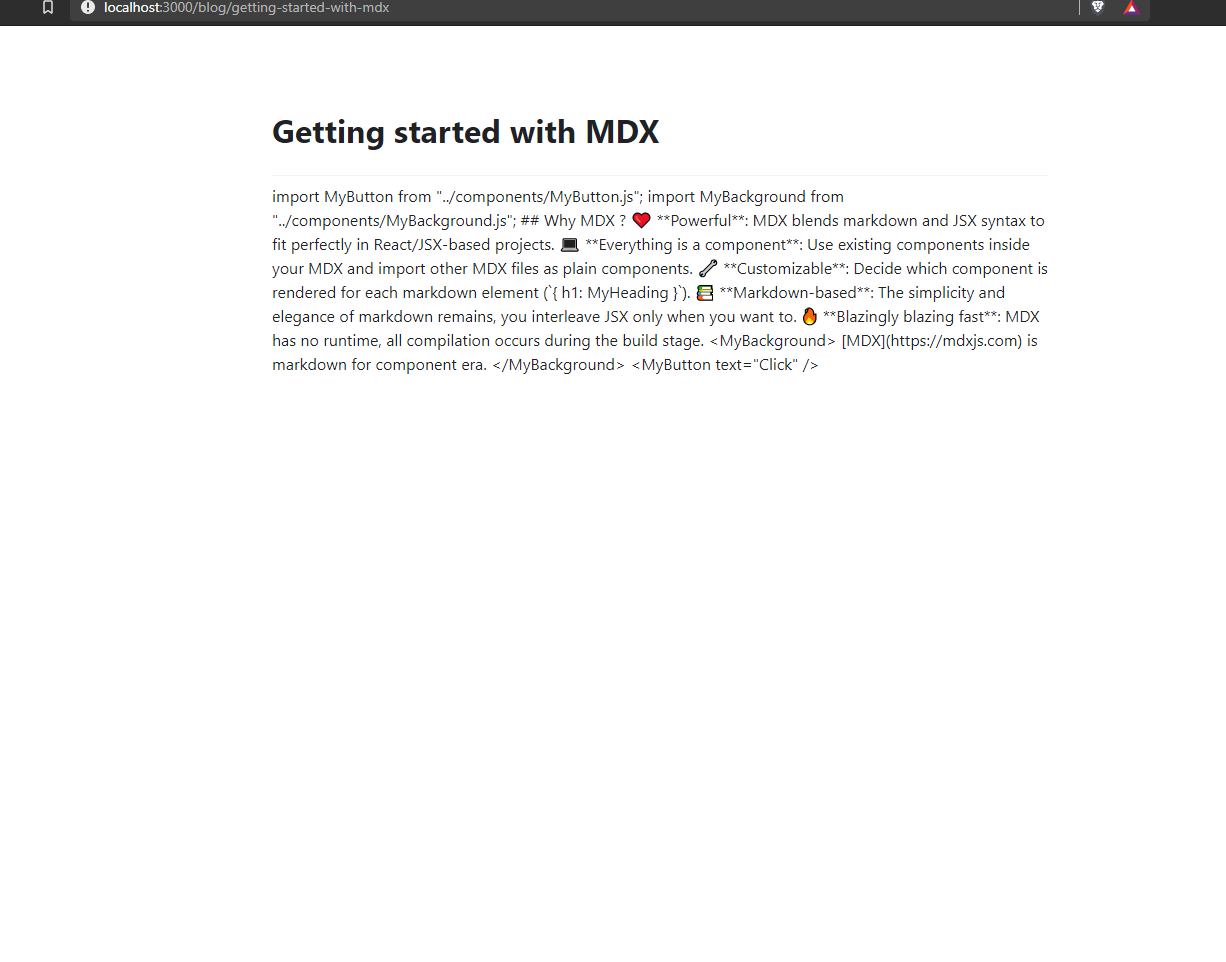
Unable to understand what's written in the post? Yeah, ditto! If it would've been a markdown file, we could've used remark, remark-html or react-markdown to convert markdown to html. But it's an mdx file and we're using components in it, how can we show our file the way it is meant to be shown?
And that's where a problem arises. Natively we can render mdx files with components easily, but first, we're rendering them through a dynamic route to save ourselves from repitition and drastic memory usage. Secondly, we've front-matter in it, and MDX does not support rendering of front-matter natively. So what's the solution now, we want our mdx files to show content, components and front-matter. This is where I got lost for few days, but you don't have to.
There are two workarounds for this -
- next-mdx-enhanced: It overcomes with some of the problems of@next/mdxand renders MDX files with a common layout, provides a way to get components and front-matter render in the post and few extra features that we probably don't need. But it does require little bit of extra config for a super smooth rendering experience.
- next-mdx-remote: By the same developer, but ~50% faster, more flexible and easier to use. It refines some of the issues ofnext-mdx-enhanced. But this is what we'll be using.
Although
4. Using next-mdx-remote
Install
npm i next-mdx-remote
And now it's time to modify our champ
// ./blog/[slug].js/** @jsx jsx */import Head from "next/head";import { getAllPostSlugs, getPostdata } from "../../lib/posts";import { Box, jsx, Text } from "theme-ui";import renderToString from "next-mdx-remote/render-to-string";import hydrate from "next-mdx-remote/hydrate";import matter from "gray-matter";import MyBackground from "../../components/MyBackground";import MyButton from "../../components/MyButton";const components = { MyBackground, MyButton };export default function Posts({ source, frontMatter }) {const content = hydrate(source, { components });return (<><Head><title>{frontMatter.title}</title></Head><Box sx={{ variant: "containers.page" }}><Box sx={{ mt: "4rem", textAlign: "center" }}><h1>{frontMatter.title}</h1><Textsx={{width: ["80%", "50%"],mx: "auto"}}>{frontMatter.author}{" / "}<span>{frontMatter.date}</span></Text></Box><Box sx={{ mt: "4rem" }}><Box>{content}</Box></Box></Box></>);}export async function getStaticPaths() {const paths = getAllPostSlugs();return {paths,fallback: false};}export async function getStaticProps({ params }) {const postContent = await getPostdata(params.slug);const { data, content } = matter(postContent);const mdxSource = await renderToString(content, {components,scope: data});return {props: {source: mdxSource,frontMatter: data}};}
We added
- renderrToStringruns at build time, so it's included ingetStaticProps. It returns an object of MDX content with components it utilizes.
- The object returned by renderToStringnow gets passed intohydratealong with the location of components we're using inside our MDX.Thishydratefunction initially renders static content and hydrate it when browser's not busy with other tasks.
If you now visit your
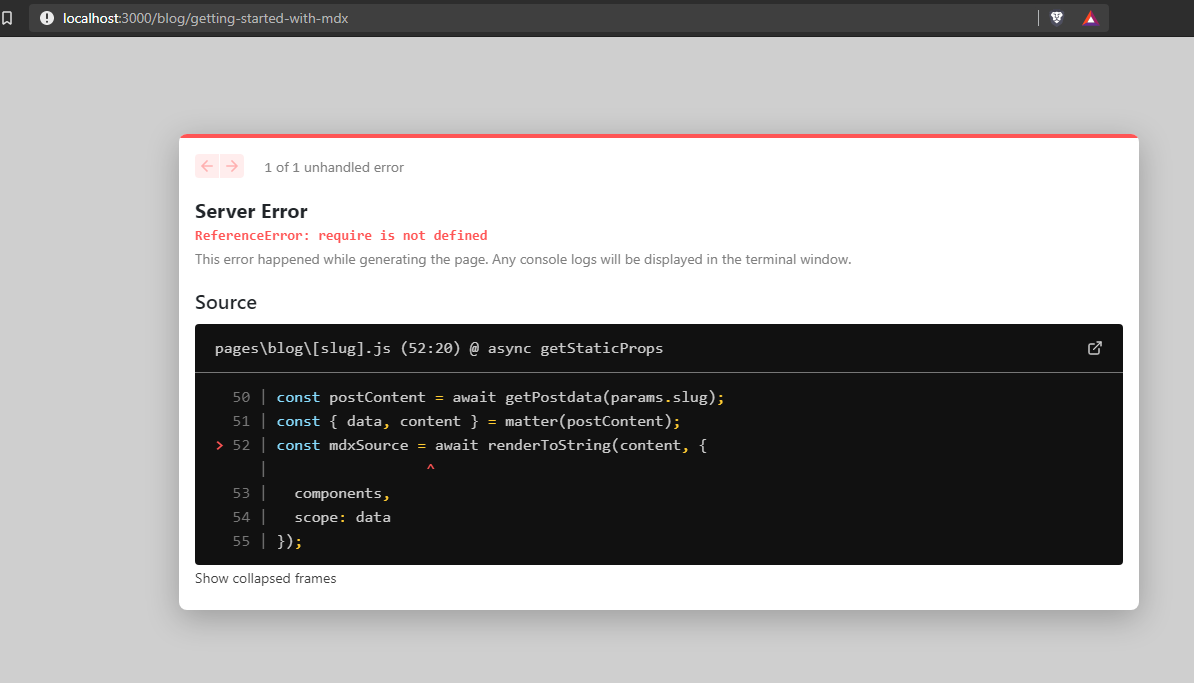
It is pointing that error is in our

Pretty amazing, right?
- Front-matter ✔️
- Formatted content ✔️
- Components rendering ✔️
So we've completed our blog? Kind of, but there's one problem left. Remember how we cannot add
Currently, we're passing the components of
// ./components/AllComponents.jsimport MyBackground from "./MyBackground";import MyButton from "./MyButton";//import as many components you're using collectively in all your postsconst AllComponents = {MyButton,MyBackground// Any other component you want};export default AllComponents;
And now, replace the components you added in
// ./blog/[slug].js//... Other import statements//Replace MyButton, Mybackground import with AllComponentsimport AllComponents from "../../components/AllComponents";//Replace {MyButton, MyBackground} with AllComponentsconst components = AllComponents;//Rest of the file remains sameexport default function Posts({ source, frontMatter }) {//...}
Voila! our blog is ready. You're good to go. Use n number of components in your MDX, all you gotta do is to add that component in your
Optional
Apart from the whole process we just completed, if you want to provide custom styles/components to native markdown components like H1, H2, lists, link, Image, etc. You can use
Working with MDXProvider
npm i @mdx-js/react
Because I'm using
// ./components/MDXProvider.js/** @jsx jsx */import { MDXProvider } from "@mdx-js/react";import { Heading, Text, jsx, Box, Link, Flex } from "theme-ui";export default function MDXCompProvider(props) {const state = {h1: (props) => <Heading as="h1" sx={{ mt: "3", mb: "2" }} {...props} />,h2: (props) => <Heading as="h2" sx={{ mt: "3", mb: "2" }} {...props} />,h3: (props) => <Heading as="h3" sx={{ mt: "3", mb: "2" }} {...props} />,h4: (props) => <Heading as="h4" sx={{ mt: "3", mb: "2" }} {...props} />,p: (props) => <Text as="p" sx={{ mb: "2", lineHeight: "2" }} {...props} />,a: (props) => (<Link as="a" sx={{ color: "secondary", fontWeight: "bold" }} {...props} />)};return (<MDXProvider components={state}><Box {...props} /></MDXProvider>);}
Here we are providing our components to be used instead of native markdown h1, h2, p, etc. You can do a lot of customizations here according to your need.
Wrapping blog with MDXProvider
Last step, We just need to wrap our Next.js blog with MDXProvider so that it can be applied automatically to our MDX files. Open
// ./pages/_app.jsimport "../styles/globals.css";import { ThemeProvider } from "theme-ui";import theme from "../theme";import MDXProvider from "../components/MDXProvider";function MyApp({ Component, pageProps }) {return (<ThemeProvider theme={theme}><MDXProvider><Component {...pageProps} /></MDXProvider></ThemeProvider>);}export default MyApp;
So we're finally done with creating our MDX blog with Next.js.
It's a lengthy process if you're new to it. Once you know the stuff, it'll be smooth af!
It's my first tutorial/technical blog, hope you like it.
Peace ✌